STEP-BY-STEP GUIDES
To begin collecting temperature data, you must first “associate” your sensors with your base station.
Follow these step-by-step instructions to add sensors to your account
Note: The software often refers to the sensors as “tags”. We will continue to call them sensors in these instructions.
The next step is to pull the battery tab out from your sensor. This will start the sensor and place it into association mode.
IMPORTANT: The sensor will only stay in association mode for a minute or two, so as soon as you pull the battery tab out, complete the next step immediately.
Click the Search Unassociated Tag button.
Now that the sensor is associated and we’re not rushed, we can change the tag name.
In the Options panel below the sensor name, you will see a series of buttons – Light, Temperature,Humidity, Motion Sensor, etc. The last button does not have a name, just an arrow icon, but when you place your mouse over it, it will say More…
Click on this button to open the options menu shown in the illustration.
Choose Change Tag Name.
In the box that pops up, type a name for your sensor. The name should reflect where the sensor will be placed. e.g. My Vaccine Fridge.

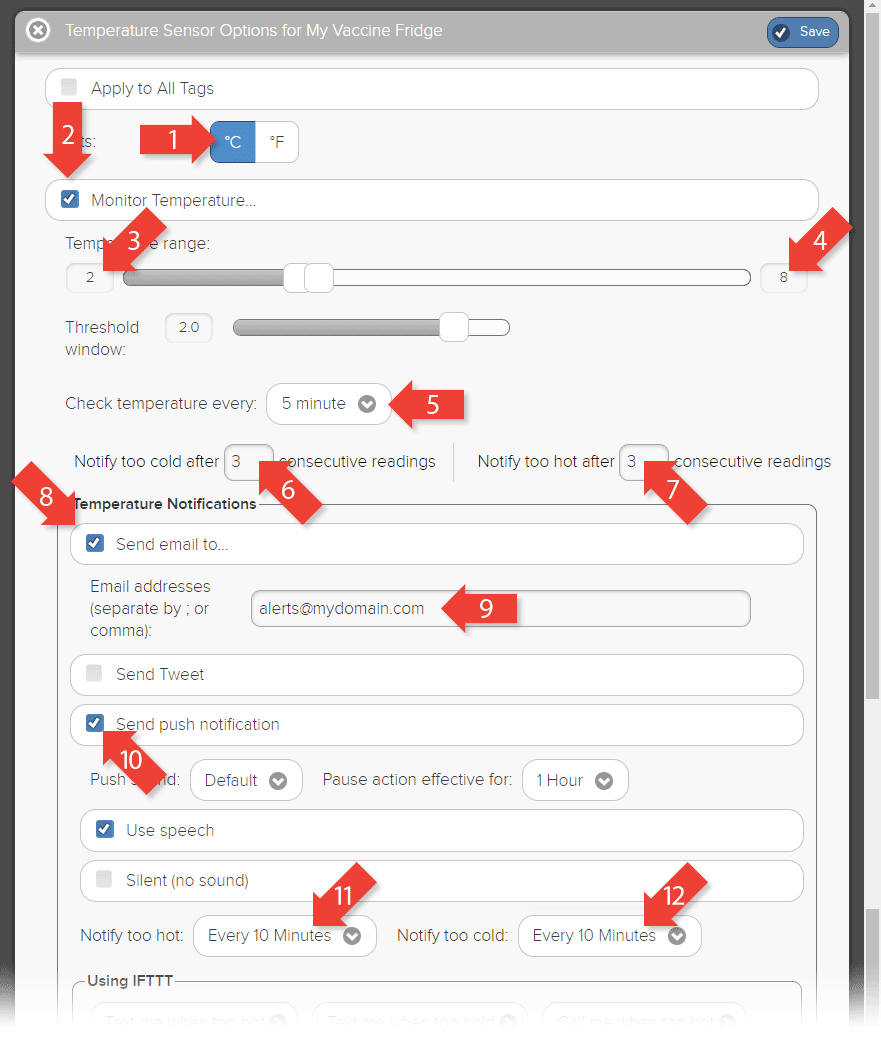
In the options panel, click the Temperature button.
This panel that opens looks complicated but it is quite straightforward.
Note: in this example we are setting the sensor up for a vaccine fridge. Depending on what you will be using the logger for, your settings may vary from these.
If you are configuring more than one sensor, tick the Apply to All Tags box at the top of the page.
Troubleshooting
To put the sensor back into “association mode”, you will need to take the battery out and put it back in.
Replacing the battery is quite a quick process, but it can be a bit fiddly.
Here is a video that explains the process…
This doesn’t make sense to most people, but sometimes the sensors won’t associate if they are too close to the base station.
If you get an error message that says the signal strength is too high, move the sensor away from the base station, hit the Search Unassociated Tags button and, if the sensor is found, the Associate button.
If the sensor drops out of “association mode” while you are doing this, you will need to take the battery out and put it back in to reset the sensor.
Replacing the battery is quite a quick process, but it can be a bit fiddly.
Here is a video that explains the process…
Not everyone is good with computers. And that’s OK.
If you’re stuck on something to do with one of our products, we’re here to help.
But can we suggest a product that will make things easier for both of us?
TeamViewer lets us securely log into your computer so that we can see exactly what you’re seeing.
And we can set things up for you while you watch so you can learn how to do it next time.
Once we’re finished, we log out and can’t log in again without your permission.
Best of all, Teamviewer is free.
Here’s the link…
This is a new type of logger and we understand that many people will have questions. We’re here to help.
You can call us on
or use the form to send us an email enquiry.
PO Box 1007,
Baulkham Hills, NSW 2153,
Australia.